Friday, 14 June 2013
Friday, 24 May 2013
Tuesday, 21 May 2013
Friday, 17 May 2013
Violin
This picture was created by overlaying original picture of violin with texture. I have used this 2 images:
I changed layer blending mode of the texture image to 'overlay'.
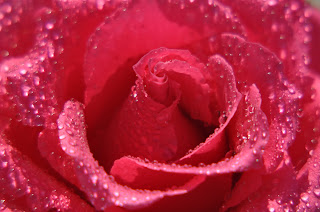
Some of my fav flower pictures
I used a sprinkler to created water droplets and shallow depth of field to help focus attention on the flower and blur the background.
Friday, 3 May 2013
I took this pictures for a college project. I have used smoked bombs to create a smoke. I bought them off Ebay for about £10. They were a bit tricky to work with because often smoke did not go the direction I wanted but they're cheaper to use than a smoke machine and another advantage is that you can use them on location.
Few paintings in watercolour
I love painting poppies for their translucent quality and I think that watercolours are great medium to portray that. I have used watercolour paints and pencils to paint poppies and I have also grated black soft pastel on a sandpaper to create little black specs in the poppy centres.
Friday, 22 March 2013
Friday, 8 March 2013
Friday, 11 January 2013
Violin 6 pictures in 1
f/22 at 30 sec
To created this picture you will need:
- tripod
- either 3 different colour light sources or a torch and flash gels (that's what I used)
- dark location
- and of course a subject. I used white violin
With camera securely on the tripod I have lit the subject with a torch, placing different colour gels in front of it. Make sure to switch the torch off when you're changing gels otherwise some of the white light from torch will filter through.
I have used long shutter speed, otherwise I wouldn't have enough time to lit the subject the way I intended to. As a result the background was overexposed (to my liking anyway, because I wanted it to be black). To fix that I darkened it with burn tool in photoshop.
Below images were created by applying different filters in photoshop.
Filter used: Glowing edges
Filter used: Colored pencil
Filter used: Charcoal (and some colouring)
Filter used: Cutout
Filter: Torn edges
Fire
What you need to make this image:
- sheet of glass
- dark background
- lighter fluid
- dark location
- tripod
Mount your camera on the tripod, position the glass horizontally and place dark background behind it. Picture needs to be underexposed so set exposure compensation to -1 (or whatever works best). Now all you need to do is to spray some lighter fluid on the glass and set it on fire and shoot away.
Tuesday, 8 January 2013
Portrait project
One of my favourite pictures. I took it for portrait project at Lincoln College. I was inspired by the work of Sia Aryai. It was intentionally overexposed. I have also added a few layers to make it look softer and more dreamy.
Orb of light
f/22 at 15 sec
It took a few tries to get this shot. I have used 'Christmas' LED light to create the orb. Camera was mounted on the tripod.
Drawing - violin
I did this drawing for 'Photography and art' unit for Photography course at Lincoln College. If you're not sure you can draw it helps to add grid on the picture you want to draw. Now all you need to do is to transfer each square on the paper. It really helps, especially to constrain proportions so you can focus on your technique.
Destroyed
This pictures were taken on Pentax film camera. I have then experimented with negatives, destroying them for creative effect.
This effect was achieved by accident. I have not dried my negative for long enough after it was developed and it got stuck to the paper in negative filing sheet. Bits of paper added texture to the photo and in my opinion added more interest to otherwise quite boring shot.
To achieve this worn out effect I have bleached the negative. I was not able to predict the effect so I did it gradually because unlike with digital photography you can't undo the changes you did to negative. I think it worked quite well, although I'm tempted to bleach it a bit more.
Light painting - orb of light
f/22 at 15 sec
It's quite easy to create this image. All you need is LED torch on a piece of string. Mount your camera on a tripod and spin the torch round. The easiest way to create an orb is to pick a spot on the floor and treat is as an axis of your orb.
How to change a photo into a drawing
To turn a photo into a drawing follow this steps:
- duplicate the layer
- desaturate the image (ctrl+u)
- duplicate the layer again
- invert the image (ctrl+i)
- change layer blending mode to 'colour dodge'
- apply gaussian blur (Filter - Blur - Gaussian Blur)
- When Gaussian Blur icon pops up choose radius between 1 - 3 (or what you think works best)
You can then add some other effects. I have used mosaic filter the picture above and added some colour
Subscribe to:
Comments (Atom)


